In embedded systems, a push button or mechanical switch may seem like the simplest of input devices. But under the hood, there’s a common challenge known as switch bounce—rapid, unintended signal changes caused by the mechanical nature of switches. Without proper switch debounce, these false triggers can confuse digital systems and lead to erratic behavior. In this article, we explore what switch debounce is, why it’s essential, and how to implement it using both hardware and software techniques, including examples for AVR microcontrollers.
Whether you’re building a project with AVR microcontrollers or designing embedded systems with other MCUs like STM32, PIC, or MSP430, understanding how to debounce a switch properly is critical for accurate and reliable digital input.
Table of Contents
What Is Switch Bounce and Switch Debounce?
Mechanical switches aren’t perfect. When you press or release a button, the metal contacts inside tend to “bounce” several times before settling. This bounce happens in a matter of milliseconds, but microcontrollers are fast enough to detect each of those bounces as individual presses.
To your microcontroller, this switch bounce or button bounce looks like the button was pressed multiple times quickly. It can lead to false triggers, glitches, or unwanted actions in your program.
This results in:
- Multiple unwanted interrupts
- Unreliable user input
- Poor system behavior
What Is Switch Debounce?
Switch debounce is the technique of smoothing out those bounces—ignoring them or filtering them—so your program sees only one clean transition per press or release.
There are two main approaches to debounce a switch:
- Hardware debounce
- Software debounce
Let’s explore both methods.
1. Hardware Debounce Techniques
Hardware debounce uses external components to condition the input signal before it even reaches your microcontroller. It’s a reliable method that doesn’t use up valuable CPU time.
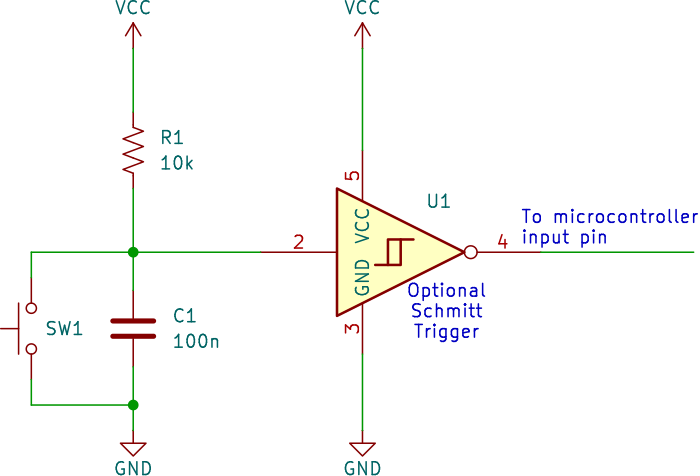
RC Switch Debounce Circuit
A simple and widely used hardware debounce method involves a resistor-capacitor (RC) low-pass filter:
- Connect a pull-up resistor and capacitor to the switch.
- When the switch opens or closes, the capacitor smooths the transitions.
- A Schmitt trigger buffer (optional) can help clean up the signal further.
Typical Values:
- R = 10kΩ
- C = 100nF (0.1µF)
These values give a debounce time of around 10ms. Adjust them based on your needs.
Example Switch Debounce Circuit:
- Connect a pull-up resistor (e.g., 10kΩ) from the microcontroller pin to Vcc.
- Place a push button between the pin and ground.
- Add a capacitor (e.g., 0.1µF) between the pin and ground to filter the noise.
You can also use logic ICs with Schmitt trigger inputs, such as the 74HC14, which provides hysteresis and filters out rapid changes. Specialized debounce ICs like the MAX6816 can handle debounce automatically, but are less commonly used in basic projects.
Bonus Tip: Use a logic analyzer to visualize bounce and confirm that your circuit is working.
2. Software Debounce Techniques
When you want flexibility or don’t have space for extra components, software debounce is a great solution. It involves filtering out bounce in your firmware.
2.1 Delay-Based Switch Debounce (Simple)
After detecting a button press, add a short delay (e.g., 10ms) and check again.
Example in AVR C (polling-based):
if (!(PINB & (1 << PB0))) {
    _delay_ms(10);  // wait for bounce to settle
    if (!(PINB & (1 << PB0))) {
        // Confirmed button press
    }
}
This method is easy but blocks the CPU during the delay, which isn’t ideal in time-sensitive applications.
2.2 Timer-Based Switch Debounce (Non-blocking)
Use a timer to debounce the switch in a non-blocking way—ideal for real-time systems.
Steps:
- Detect the state change (rising/falling edge).
- Start a timer.
- After a timeout (e.g., 10ms), check if the state is stable.
- Only then register the press or release.
Example (pseudo-code for AVR):
ISR(PCINT0_vect) {
    // On pin change, start debounce timer
    debounce_timer = 0;
    debounce_pending = 1;
}

void check_debounce() {
    if (debounce_pending && debounce_timer >= 10) {
        if ((PINB & (1 << PB0)) == stable_state) {
            // Stable input after bounce
            handle_button_event();
        }
        debounce_pending = 0;
    }
}
3. Debouncing in Interrupt-Driven Systems
For embedded systems using interrupts to detect switch presses, debouncing becomes a bit trickier:
- Use a flag and timer inside the interrupt service routine (ISR).
- Disable further interrupts during the debounce period.
- Or ignore button events until the debounce time has passed.
This technique ensures minimal CPU usage while avoiding false triggers.
4. AVR Examples for Switch Debounce
AVR microcontrollers are perfect for experimenting with both hardware and software debounce.
Example: Debounce a Push Button on ATmega328P
- Pin: PB0
- Debounce delay: 10ms
- Method: Delay-based polling or Timer0 overflow
These techniques also apply to popular platforms like Arduino, which uses AVR chips under the hood. You can debounce push buttons with code or external RC filters, depending on your project’s complexity.
5. Best Practices for Reliable Button Debounce
- Use a combination of hardware and software debounce when possible.
- Always test your debounce logic with different types of buttons.
- Adjust debounce time for your specific application—don’t just copy values from tutorials.
- For mission-critical applications, prefer hardware debounce or firmware timer-based methods.
Final Thoughts on Switch Debounce
Debouncing might seem like a small detail, but it’s vital for building reliable embedded systems. Whether you’re using AVRs, Arduino, or any other microcontroller, understanding switch bounce and mastering debounce techniques will make your designs more stable and user-friendly.
By implementing either a hardware debounce circuit or writing efficient software debounce routines, you’ll prevent those frustrating false presses and improve the overall performance of your embedded system.
Understanding this topic is a key step in becoming a confident embedded developer.
You may be interested in our article on how to choose the best AVR programmers.